
Journey into the Jungle
You’ve just hacked your way into a new, uncharted OpenShift jungle. It’s humid, foreign, and has a faint, lingering scent… “is that the smell of an old used hat?” you think to yourself, “Or perhaps just the musk of a thousand unoptimized containers?” You wipe the sweat from your brow, your twin Pure FlashArrays strapped to your back like high-tech oxygen tanks.
Suddenly, the vines part to reveal two ancient temples. One is small and ornate; you just know the data here will be lightweight but precious. The other is a sprawling, neon-colored monolith choked in thick brush. You gasp slightly, realizing this is a data-hungry beast that’s going to need some serious IOPS. To conquer this terrain, you can’t just pick one; you need to bridge both worlds. But how do you manage multiple arrays without getting lost in the undergrowth?
Prerequisites: Preparing the Ground
Before diving into the configuration, ensure your environment meets these specific requirements:
- Portworx Operator: Installed and running with an active
StorageClusterconfiguration. - FlashArray Readiness: All FlashArrays must be racked, powered, and have network-accessible connector interfaces (iSCSI, Fibre Channel or NVMe) ready to receive storage traffic from your OpenShift nodes.
- User Permissions: You must have a dedicated user account on each FlashArray with an API Token generated.
- Network Connectivity: Ensure your OpenShift nodes have a clear network path to the Management Endpoints of all targeted FlashArrays.
Step 1: Defining the “Pod” in Purity
For Portworx to distinguish between different arrays, we utilize a Pod. In Purity, a Pod is typically used for replication (like ActiveDR), but here we use it as a logical identifier for CSI-driven volumes. Here is a high level diagram:
graph LR
    %% Define styles
    classDef fa fill:#f96,stroke:#333,stroke-width:2px,color:#fff;
    classDef fa_large fill:#e65100,stroke:#333,stroke-width:3px,color:#fff;
    classDef px fill:#DEA193,stroke:#333,stroke-width:2px,color:#fff;
    classDef sc fill:#95685D,stroke:#333,stroke-width:1px,color:#000;
    classDef pxo fill:#95685D,stroke:#333,stroke-width:1px,color:#000;

    subgraph PX_OPS [Portworx Operator]
        Secret[px-pure-secret]:::px
        CSIPods[Portworx CSI Pods]:::px

        SC1[StorageClass: Small-Apps]:::sc
        SC2[StorageClass: Big-Data]:::sc
    end

    %% StorageClass to Pod Logic
    SC1 -.->|pure_fa_pod_name: small-pod| CSIPods
    SC2 -.->|pure_fa_pod_name: large-pod| CSIPods
    Secret -.->|API Tokens| CSIPods

    %% Target Arrays
    FA1[FlashArray //X70<br/>'Small Temple']:::fa
    FA2[FlashArray //XL170<br/>'Large Temple']:::fa_large

    %% Data Path Connections
    CSIPods == iSCSI/FC/NVMe ==> Pod1
    CSIPods == iSCSI/FC/NVMe ==> Pod2

    %% Pod Logical Mapping
    Pod1(Purity Pod: small-pod) --- FA1:::fa
    Pod2(Purity Pod: large-pod) --- FA2:::fa_large

    linkStyle 4 stroke:#D0C8BA,stroke-width:2px;
    linkStyle 5 stroke:#e65100,stroke-width:4px;
    style PX_OPS fill:#FF7023,stroke:#0052cc,stroke-width:2px
To create a pod:
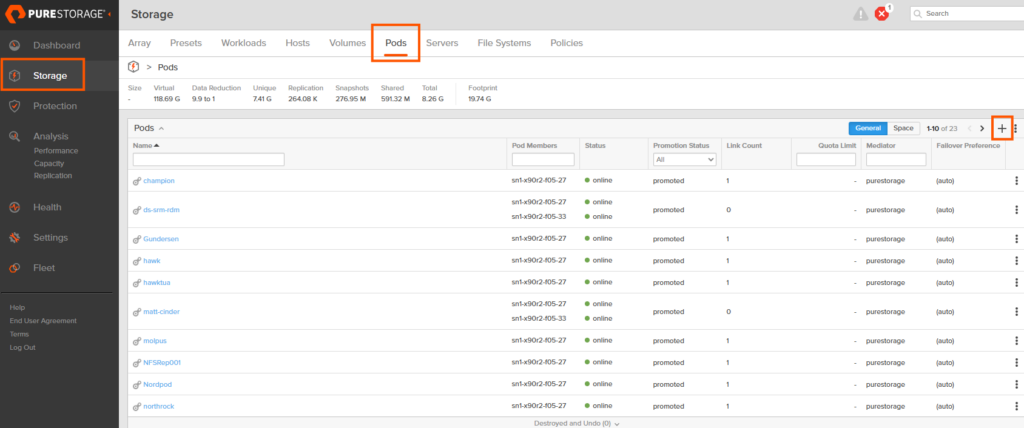
- Log in to the Purity UI.
- Navigate to Storage in the left-hand pane.
- Select the Pods tab at the top.
- Click the plus (+) icon to create a new Pod.
- Name the Pod (e.g.,
prod-array-01) and click Create. - Repeat this process for every FlashArray you intend to use with OpenShift.
Step 2: Configure the px-pure-secret
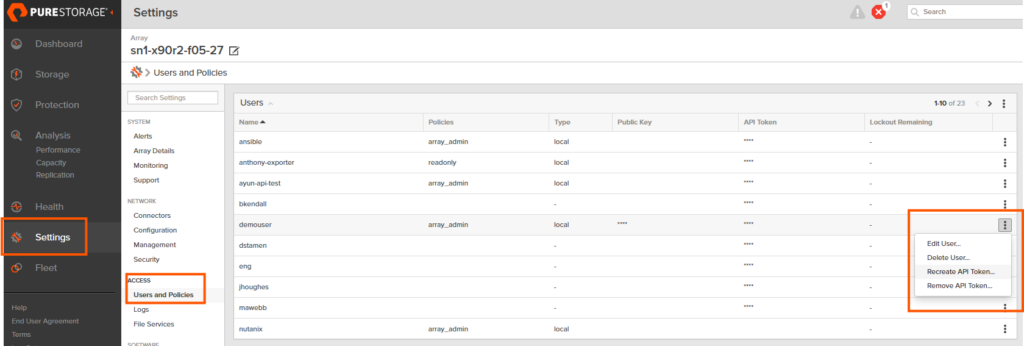
OpenShift needs to know how to talk to your arrays. We consolidate this information into a single JSON file that becomes a Kubernetes Secret. If you have not done so, you need to have a user account with storage admin permissions and create an API key. You can follow this documentation, but here is a quick snippet of where you can find this:
Purity: Settings->Access-> Users and Policies -> Ellipses “Create API Token”
Create a file named pure.json with the following structure:
JSON
{
  "FlashArrays": [
    {
      "MgmtEndPoint": "<FlashArray_1_Management_IP>",
      "APIToken": "<FlashArray_1_API_Token>"
    },
    {
      "MgmtEndPoint": "<FlashArray_2_Management_IP>",
      "APIToken": "<FlashArray_2_API_Token>"
    }
  ]
}
Next, apply this to your cluster. If the secret already exists, you can delete and recreate; otherwise, create it in your Portworx namespace (usually portworx):
Bash
# create a new secret
oc create secret generic px-pure-secret -n <stc namespace, usually "portworx"> --from-file=pure.json
Note: Make sure the name of the secret is px-pure-secret or portworx will not pick up the secret…
Step 3: Define Array-Specific StorageClasses
Now we tie it all together. You will create a StorageClass for each array, using the pure_fa_pod_name parameter to point to the Pod we created in Step 1.
YAML
apiVersion: storage.k8s.io/v1
kind: StorageClass
metadata:
  name: pure-block-array-1
parameters:
  backend: "pure_block"
  pure_fa_pod_name: "<name-of-pod-on-array-1>"
provisioner: pxd.portworx.com
volumeBindingMode: WaitForFirstConsumer
Note: Create a separate StorageClass for each Pod/Array combination to give your users the ability to choose their storage destination.
Step 4: Refresh the CSI Pods
If you are adding an array to an existing environment, Portworx needs to reload the secret to establish connectivity with the new hardware. The quickest way is to bounce the Portworx pods:
Bash
oc delete pods --all -n portworx
Portworx will automatically recreate these pods, pick up the new secret, and register the new FlashArray backends.
Outro
As the dust settles and the hum of your newly connected FlashArrays replaces the sounds of the thicket, you can finally step back and admire the view. Those once-intimidating “data temples” are now fully integrated into your OpenShift ecosystem, humming along with the efficiency only a well-tuned Everpure Data Cloud can provide.
You’ve successfully mapped the uncharted territory of multi-array storage. The jungle hasn’t changed, it’s still humid, and yes, it still smells a bit like an old red hat… but you’re no longer hacking through the vines. You’re the one holding the map.
Now, go forth and provision with confidence. Your infrastructure is no longer just surviving the wild; it’s ruling it.