
Intro
If the post-Broadcom migration was a prism splitting white light into a spectrum of options, a bright red ray of light would be Red Hat, battle-tested in the enterprise grade linux operating system now moving into the infrastructure platform space. While it might not have the exotic appeal of NVMe/TCP, iSCSI has earned its place the old-fashioned way: it just works, it’s everywhere, and every storage and networking team already understands it.
This guide picks up where my NVMe/TCP guide left off. Same cast of characters, Pure FlashArray, Portworx Enterprise, and OpenShift Virtualization. However, this time we are running over iSCSI. A key difference you will notice right away: with iSCSI, Portworx can manage multiple storage interfaces simultaneously via PURE_ISCSI_ALLOWED_IFACES. You don’t need OS-level bonding; Portworx handles the multipath session management for you.
References:
- https://docs.portworx.com/portworx-enterprise/platform/install/pure-storage/flasharray
- https://docs.redhat.com/en/documentation/openshift_container_platform/4.20/html/kubernetes_nmstate/k8s-nmstate-updating-node-network-config
Part 1: Networking Two Standalone iSCSI Interfaces
1.1 Why No Bond This Time?
In the NVMe/TCP guide we built a bond for the storage interfaces. For iSCSI with Portworx, you are able to configure two separate standalone VLAN subinterfaces on your hosts. Portworx will use both for iSCSI sessions via PURE_ISCSI_ALLOWED_IFACES, giving you path-level redundancy and throughput without the OS needing to know anything about bonding.
Each worker node ends up with:
<nic1>.<vlan-id>— first storage VLAN subinterface, one IP<nic2>.<vlan-id>— second storage VLAN subinterface, second IP- MTU 9000 (jumbo frames) on both
Tip: NMState Operator First:
Before applying anyNodeNetworkConfigurationPolicy(NNCP), make sure the Kubernetes NMState Operator is installed and itsNMStateinstance has been created. You can find it in Ecosystem → Software Catalog in the OpenShift web console.
1.2 IP Address Plan
You will need two IP addresses per worker node on the storage subnet, one per NIC. Here is an example layout (substitute your own values throughout):
| Worker node | NIC 1 VLAN IP | NIC 2 VLAN IP |
|---|---|---|
<worker-1-hostname> | <worker-1-nic1-ip>/<prefix> | <worker-1-nic2-ip>/<prefix> |
<worker-2-hostname> | <worker-2-nic1-ip>/<prefix> | <worker-2-nic2-ip>/<prefix> |
<worker-3-hostname> | <worker-3-nic1-ip>/<prefix> | <worker-3-nic2-ip>/<prefix> |
Create one NNCP per worker node because each node gets unique IP addresses.
1.3 Something I Ran Into… Route Tables
Here’s where I hit a wall that I did not expect. When you put two IPs from the same subnet on two different interfaces, Linux’s default behavior is to use a single kernel routing table. That means traffic that arrives on <nic2>.<vlan-id> might get a response routed out <nic1>.<vlan-id>, because that’s where the kernel’s one default route points. Asymmetric routing is a problem in any environment, it is a non-starter in storage area networks.
The fix is policy-based routing: give each interface its own private route table, then add ip rule entries that say “if the source IP is NIC1’s address, use NIC1’s table, and the same for NIC2.” This way traffic always leaves the same interface it arrived on. NMState handles this cleanly with the routes and route-rules stanzas directly in the NNCP.
Still Researching:
I’m currently looking into whether this policy-based routing setup is universally required whenever you run two iSCSI interfaces on the same network segment, or whether it only bites you in certain topologies (e.g. when both NICs see the same gateway). If you have hit this, you can leverage the Route Tables as i have done in the NNCP. If you know an alternative, better way to avoid the asymmetry, I’d love to hear from you on LinkedIn. Alternatively you could assign each host interface on a separate VLAN or bond the interfaces.
1.4 Example NNCP: Two Standalone Subinterfaces with Route Tables
The NNCP below adds two custom route tables (one per NIC) and the matching route-rules that pin each source IP to its own table. Substitute your own interface names, VLAN ID, IP addresses, subnet prefix, and storage gateway throughout.
apiVersion: nmstate.io/v1
kind: NodeNetworkConfigurationPolicy
metadata:
  name: storage-iscsi-worker-1    # unique per node
spec:
  nodeSelector:
    kubernetes.io/hostname: <worker-1-hostname>
  desiredState:
    interfaces:
      - name: <nic1>.<vlan-id>    # e.g. ens1f0np0.210
        type: vlan
        state: up
        mtu: 9000
        vlan:
          base-iface: <nic1>
          id: <vlan-id>
        ipv4:
          enabled: true
          address:
            - ip: <worker-1-nic1-ip>
              prefix-length: <prefix>
          dhcp: false

      - name: <nic2>.<vlan-id>    # e.g. ens1f1np1.210
        type: vlan
        state: up
        mtu: 9000
        vlan:
          base-iface: <nic2>
          id: <vlan-id>
        ipv4:
          enabled: true
          address:
            - ip: <worker-1-nic2-ip>
              prefix-length: <prefix>
          dhcp: false

    routes:
      config:
        # Route table 210 — used exclusively by NIC1
        - destination: <storage-subnet>/<prefix>   # e.g. 10.10.20.0/24
          next-hop-address: 0.0.0.0
          next-hop-interface: <nic1>.<vlan-id>
          table-id: 210
        - destination: 0.0.0.0/0
          next-hop-address: <storage-gateway>      # e.g. 10.10.20.1
          next-hop-interface: <nic1>.<vlan-id>
          table-id: 210

        # Route table 211 — used exclusively by NIC2
        - destination: <storage-subnet>/<prefix>
          next-hop-address: 0.0.0.0
          next-hop-interface: <nic2>.<vlan-id>
          table-id: 211
        - destination: 0.0.0.0/0
          next-hop-address: <storage-gateway>
          next-hop-interface: <nic2>.<vlan-id>
          table-id: 211

    route-rules:
      config:
        # Traffic sourced from NIC1's IP → use table 210
        - ip-from: <worker-1-nic1-ip>/32
          route-table: 210
          priority: 100
        # Traffic sourced from NIC2's IP → use table 211
        - ip-from: <worker-1-nic2-ip>/32
          route-table: 211
          priority: 101
Apply from the OpenShift UI: Networking → NodeNetworkConfigurationPolicy → Create → With YAML. Repeat for each worker node, updating the hostname, IP addresses, and route-rule source IPs each time.
1.5 Verifying Connectivity
oc get nncp
oc get nnce
Both policies (nncp) and per-node enactments (nnce) need to show Available / Succeeded before you move on.
To verify the route rules landed correctly on a node:
oc debug node/<worker-hostname> -- chroot /host bash -c \
  "ip rule show && ip route show table 210 && ip route show table 211"
You should see two from <ip> lookup <table> rules and each custom table should have both a connected route and a default gateway route pointing through the right interface.
To check iSCSI reachability from both storage IPs:
oc debug node/<worker-hostname> -- chroot /host bash -c \
  "nc -zv <fa-iscsi-ip-1> 3260 && nc -zv <fa-iscsi-ip-2> 3260"
Part 2: Pre-flight Checks
2.1 Why IQNs Matter More for iSCSI
In iSCSI land, every host has an iSCSI Initiator Name (IQN), a unique string that the FlashArray uses to identify the host presenting storage. When OpenShift nodes are deployed from a common image (like the Assisted Installer ISO), they often all come out of the box with the exact same IQN. The FlashArray sees them all as one host. That is bad.
Think of it like giving every house on the street the same mailing address. The post office (FlashArray) gets confused about where to deliver the package (I/O).
This is why we run a pre-flight loop before applying any MachineConfig:
oc get clusteroperators
oc get nodes
Make sure everything is Available=True and Ready first.
2.2 Collect IQNs from Every Worker
Run this loop from your management station. It will SSH into each worker via oc debug and pull the current IQN and machine ID:
for node in $(oc get nodes -l node-role.kubernetes.io/worker \
  -o jsonpath='{.items[*].metadata.name}'); do
  echo "=== $node ==="
  oc debug node/$node -- chroot /host bash -c \
    "cat /etc/iscsi/initiatorname.iscsi && cat /etc/machine-id"
done
If two or more nodes share the same IQN, and they almost certainly will, copy that IQN down. That’s your template IQN and you’ll need it in the MachineConfig step.
Tip: Verify TCP 3260 While You Are Here:
Addnc -zv <fa-iscsi-ip> 3260to the debug loop above to confirm each worker can actually reach your FlashArray iSCSI ports on the storage VLAN. If these don’t connect, fix the NNCP first.
Part 3: MachineConfig: Setting Up the Workers for iSCSI
This is the most important, and most misunderstood, part of the whole process. RHCOS (the OS underneath OpenShift) is an immutable operating system. You cannot SSH in and edit /etc/multipath.conf and call it a day. Any change you make manually will get wiped on the next node reprovision.
The right way is a MachineConfig. Think of it as a declarative “recipe” for how you want the OS to be configured. The Machine Config Operator (MCO) takes your YAML, stamps it onto each node, and reboots them (one at a time) to apply it.
! MachineConfigs Will Reboot Nodes:
A rolling reboot starts as soon as you apply a MachineConfig. Plan accordingly if you’re doing this on a live cluster.
Our MachineConfig for iSCSI does five things:
- udev rules: Tunes the I/O scheduler, entropy collection, CPU affinity, and HBA timeout for Pure FlashArray SCSI/iSCSI devices
multipath.conf: Configures DM-Multipath with ALUA-based path selection for Pure FlashArray iSCSI- ARP sysctl: Prevents “ARP flux” when your storage IPs live on VLAN subinterfaces
iscsid.conf: Setsnode.startup = manualso Portworx (not the OS) manages iSCSI sessionsfix-duplicate-iqn.service: A one-shot systemd unit that regenerates the IQN if it matches the template IQN from section 2.2
3.1 Encode Your Config Files
Each file embedded in a MachineConfig needs to be Base64-encoded. Prepare each file with your environment-specific values and encode them:
# Encode udev rules
base64 -w 0 /path/to/99-pure-storage.rules

# Encode multipath.conf
base64 -w 0 /path/to/multipath.conf

# Encode ARP sysctl (with your storage VLAN subinterface names substituted)
base64 -w 0 /path/to/99-iscsi-arp.conf

# Encode iscsid.conf
base64 -w 0 /path/to/iscsid.conf
The key line in your multipath.conf for Pure FlashArray iSCSI looks like this:
defaults {
    user_friendly_names no
    enable_foreign "^$"
    polling_interval    10
    find_multipaths yes
}

devices {
    device {
        vendor                   "PURE"
        product                  "FlashArray"
        path_selector            "service-time 0"
        hardware_handler         "1 alua"
        path_grouping_policy     group_by_prio
        prio                     alua
        failback                 immediate
        path_checker             tur
        fast_io_fail_tmo         10
        user_friendly_names      no
        no_path_retry            0
        features                 0
        dev_loss_tmo            600
    }
}

blacklist_exceptions {
    property "(SCSI_IDENT_|ID_WWN)"
}

blacklist {
    devnode "^pxd[0-9]*"
    devnode "^pxd*"
    device {
        vendor "VMware"
        product "Virtual disk"
    }
}
And your ARP sysctl file (dots in interface names become slashes in sysctl keys):
net.ipv4.conf.ens1f0np0/2245.arp_ignore = 2
net.ipv4.conf.ens1f1np1/2245.arp_ignore = 2
net.ipv4.conf.ens1f0np0/2245.arp_announce = 2
net.ipv4.conf.ens1f1np1/2245.arp_announce = 2
Note: Interface Names in ARP Sysctl:
Replaceens1f0np0.2245andens1f1np1.2245with your own storage VLAN subinterface names. Every environment is different here. The dot (.) in the interface name becomes a forward slash (/) in the sysctl key.
3.2 Apply the MachineConfig
The full MachineConfig YAML assembles all four encoded files and the fix-duplicate-iqn service into one resource. The critical pieces:
apiVersion: machineconfiguration.openshift.io/v1
kind: MachineConfig
metadata:
  labels:
    machineconfiguration.openshift.io/role: worker
  name: 99-px-iscsi-optimization
spec:
  config:
    ignition:
      version: 3.2.0
    storage:
      files:
      - contents:
          source: "data:text/plain;charset=utf-8;base64,<base64-encoded-udev-rules>"
        mode: 0644
        path: /etc/udev/rules.d/99-pure-storage.rules
      - contents:
          source: "data:text/plain;charset=utf-8;base64,<base64-encoded-multipath-conf>"
        mode: 0644
        path: /etc/multipath.conf
      - contents:
          source: "data:text/plain;charset=utf-8;base64,<base64-encoded-arp-sysctl>"
        mode: 0644
        path: /etc/sysctl.d/99-iscsi-arp.conf
      - contents:
          source: "data:text/plain;charset=utf-8;base64,<base64-encoded-iscsid-conf>"
        mode: 0644
        path: /etc/iscsi/iscsid.conf
    systemd:
      units:
      - name: iscsid.service
        enabled: true
      - name: multipathd.service
        enabled: true
      - name: fix-duplicate-iqn.service
        enabled: true
        contents: |
          [Unit]
          Description=Regenerate iSCSI InitiatorName if it matches the template IQN
          Before=iscsid.service
          ConditionPathExists=/etc/iscsi/initiatorname.iscsi
          DefaultDependencies=no

          [Service]
          Type=oneshot
          RemainAfterExit=yes
          ExecStart=/bin/bash -c '\
            TEMPLATE_IQN="<TEMPLATE_IQN>"; \
            CURRENT=$(grep -oP "(?<=InitiatorName=).*" /etc/iscsi/initiatorname.iscsi || true); \
            if [ -z "$CURRENT" ] || [ "$CURRENT" = "$TEMPLATE_IQN" ]; then \
              NEW_IQN="iqn.$(date +%Y-%m).$(hostname -d | tr "." "\n" | tac | paste -sd"."):$(cat /proc/sys/kernel/random/uuid)"; \
              echo "InitiatorName=${NEW_IQN}" > /etc/iscsi/initiatorname.iscsi; \
            fi'

          [Install]
          WantedBy=multi-user.target
Apply it and watch the pool update, this takes a few minutes as each node reboots:
oc apply -f 99-px-iscsi-optimization.yaml
oc get mcp worker -w
Wait until UPDATED=True and UPDATING=False. Then verify that every node now has a unique IQN:
for node in $(oc get nodes -l node-role.kubernetes.io/worker \
  -o jsonpath='{.items[*].metadata.name}'); do
  echo "=== $node ==="
  oc debug node/$node -- chroot /host bash -c \
    "cat /etc/iscsi/initiatorname.iscsi && systemctl is-active iscsid multipathd"
done
Each node should have a different IQN and both iscsid and multipathd should be active.
Part 4: Installing the Portworx Operator
If you read the NVMe/TCP guide, this section will feel very familiar. Same operator, same OperatorHub, same flow.
- In the OpenShift web console, go to Operators → OperatorHub
- Search for Portworx
- Select Portworx Certified (published by Pure Storage, under the Red Hat Certified catalog)
- Set Installation Mode to a specific namespace, and set Installed Namespace to
portworx, create that namespace first if needed:
oc create namespace portworx
- Click Install and wait for the status to show Succeeded
Verify from the CLI before continuing:
oc get pods -n portworx | grep portworx-operator
oc get crd | grep storagecluster
Do not move on until the operator pod is Running and the StorageCluster CRD exists.
Part 5: Connecting Portworx to Your FlashArray
5.1 Create a FlashArray API User
On the FlashArray, create a dedicated service account for Portworx with Storage Admin permissions and generate an API token. The Pure Storage documentation has a step-by-step walkthrough via the GUI: REST API Setup through the GUI.
Keep the token somewhere safe, you will only see it once.
5.2 Build the pure.json Secret
Create a pure.json file:
{
  "FlashArrays": [
    {
      "MgmtEndPoint": "https://<flasharray-mgmt-ip-or-fqdn>",
      "APIToken": "<FLASHARRAY-API-TOKEN>"
    }
  ]
}
Then create the Kubernetes secret in the portworx namespace:
oc create secret generic px-pure-secret \
  -n portworx \
  --from-file=pure.json=./pure.json

oc get secret px-pure-secret -n portworx
Note: Multiple FlashArrays:
Need more than one array? Add additional entries to theFlashArrayslist. Check out the Portworx docs on multi-array configurations for the details on how StorageClasses reference individual arrays.
Part 6: Deploying the Portworx StorageCluster for iSCSI
This is where iSCSI really shines relative to NVMe/TCP. The PURE_ISCSI_ALLOWED_IFACES environment variable tells Portworx to use both of your storage VLAN subinterfaces for iSCSI sessions simultaneously. No bonding required at the OS level, Portworx handles the path management.
My recommendation is to generate your spec from Portworx Central. It builds a correctly-annotated StorageCluster for your environment and version. The example below is for reference:
kind: StorageCluster
apiVersion: core.libopenstorage.org/v1
metadata:
  name: px-cluster-iscsi
  namespace: portworx
  annotations:
    portworx.io/is-openshift: "true"
spec:
  image: portworx/oci-monitor:<portworx-version>
  imagePullPolicy: Always
  kvdb:
    internal: true
  cloudStorage:
    provider: pure
    deviceSpecs:
      - size=150,pod=<flasharray-pod-name>
    kvdbDeviceSpec: size=32,pod=<flasharray-pod-name>
    systemMetadataDeviceSpec: size=64,pod=<flasharray-pod-name>
  network:
    dataInterface: <nic1>.<vlan-id>
    mgmtInterface: br-ex
  secretsProvider: k8s
  csi:
    enabled: true
  monitoring:
    telemetry:
      enabled: true
    prometheus:
      exportMetrics: true
  env:
    - name: PURE_FLASHARRAY_SAN_TYPE
      value: "ISCSI"
    - name: PURE_ISCSI_ALLOWED_IFACES
      value: "<nic1>.<vlan-id>,<nic2>.<vlan-id>"
Apply and watch the pods come up:
oc apply -f portworx-csi-iscsi.yaml
oc get pods -n portworx -w
When the core Portworx pods flip to Running, you’re ready to create a StorageClass:
allowVolumeExpansion: true
apiVersion: storage.k8s.io/v1
kind: StorageClass
metadata:
  name: px-flasharray-block
  annotations:
    storageclass.kubernetes.io/is-default-class: "true"
parameters:
  backend: pure_block
provisioner: pxd.portworx.com
reclaimPolicy: Delete
volumeBindingMode: WaitForFirstConsumer
oc apply -f flasharray-storageclass.yaml
oc get storageclass
Note on Transport Parameters:
Unlike some other iSCSI configurations you may have seen, you do not need to addpure_fa_pod_nameorpure_host_transportas StorageClass parameters. The transport type is already set in the StorageCluster spec viaPURE_FLASHARRAY_SAN_TYPE: ISCSI.
Part 7: Creating Your First VM
This is the part we have been building toward. If your StorageCluster is healthy and your StorageClass is bound, OpenShift Virtualization will have already pulled down the OS template images in the background. You can check:
oc get pvc -n openshift-virtualization-os-images
All PVCs should be in Bound state before you continue. If any are still Pending or Importing, grab a coffee and wait for them.
Once they’re ready, head to the OpenShift web console. Let’s walk through the whole thing with screenshots.
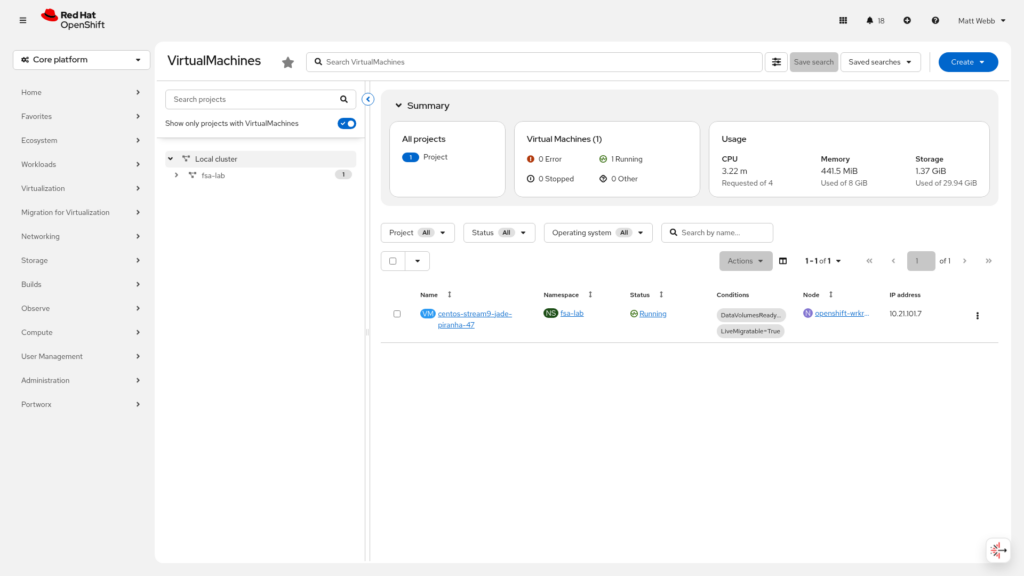
Step 1: Navigate to Virtual Machines
Go to Virtualization → VirtualMachines in the left navigation pane.
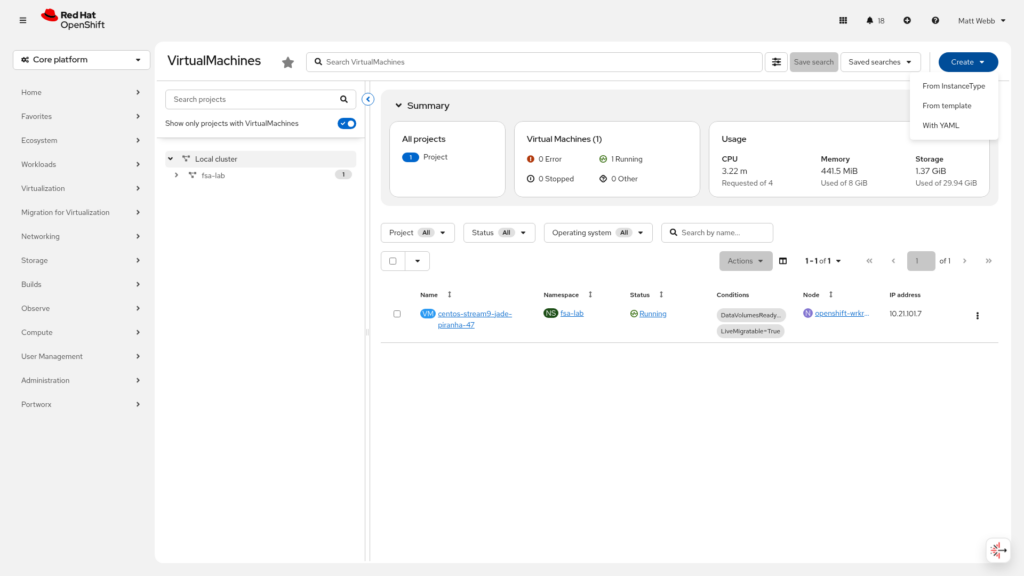
Step 2: Open the Create Menu
Click Create VirtualMachine in the top right.
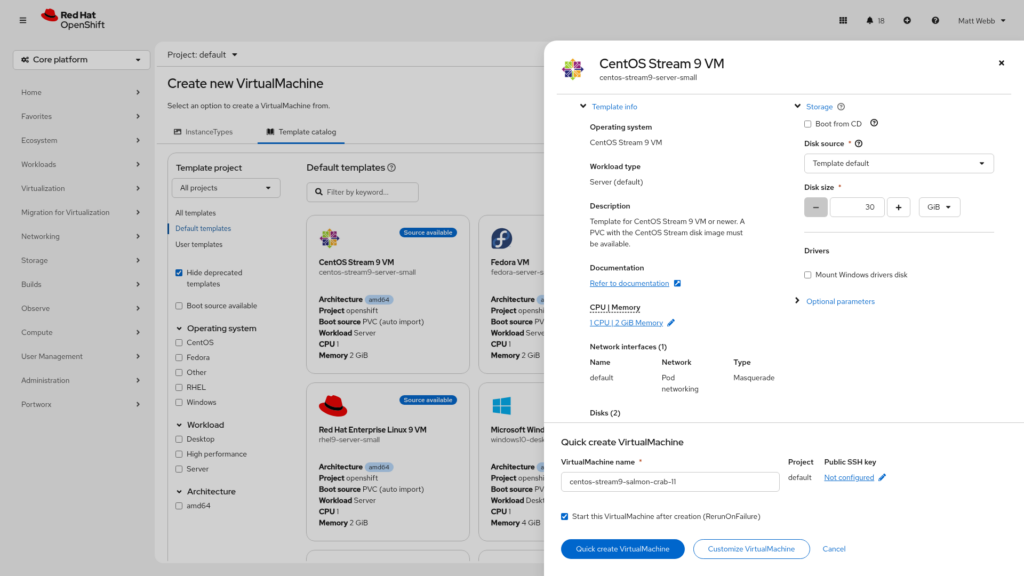
Step 3: Browse the Template Catalog
You’ll land on the template catalog. This is one of the nicest features of OpenShift Virtualization, click a tile and you’re off. Select CentOS Stream 9 (or whichever OS fits your test).

Step 4: Review the Template Details
A drawer slides in from the right with details about the template. Click Customize VirtualMachine so we can explicitly set the StorageClass for the boot disk.
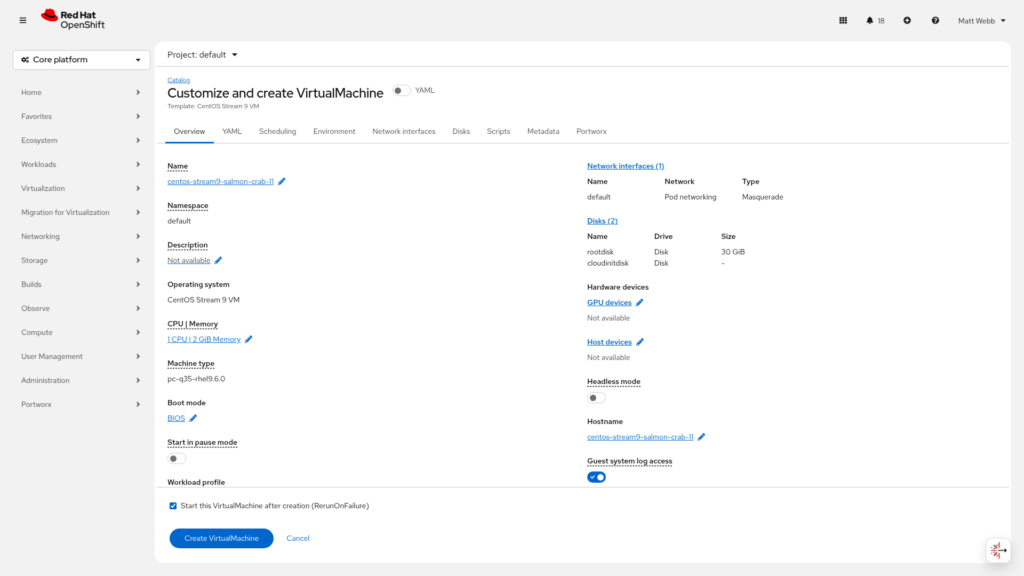
Step 5: Customize Overview
The customization wizard opens. At this stage you can set the VM name, CPU, memory, and more.
Step 6: Go to the Disks Tab
Click the Disks tab to manage storage. You’ll see the default root disk already listed.
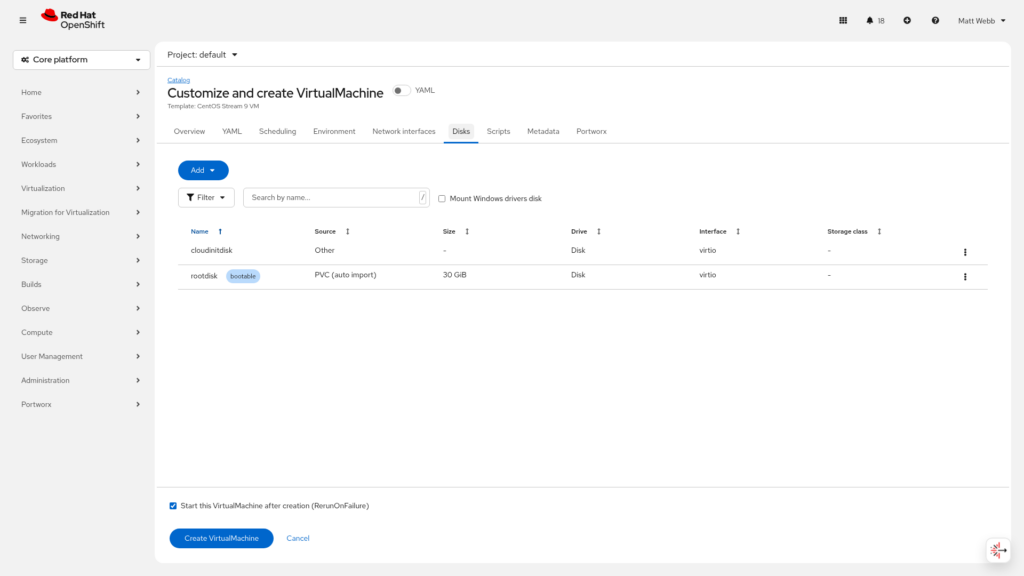
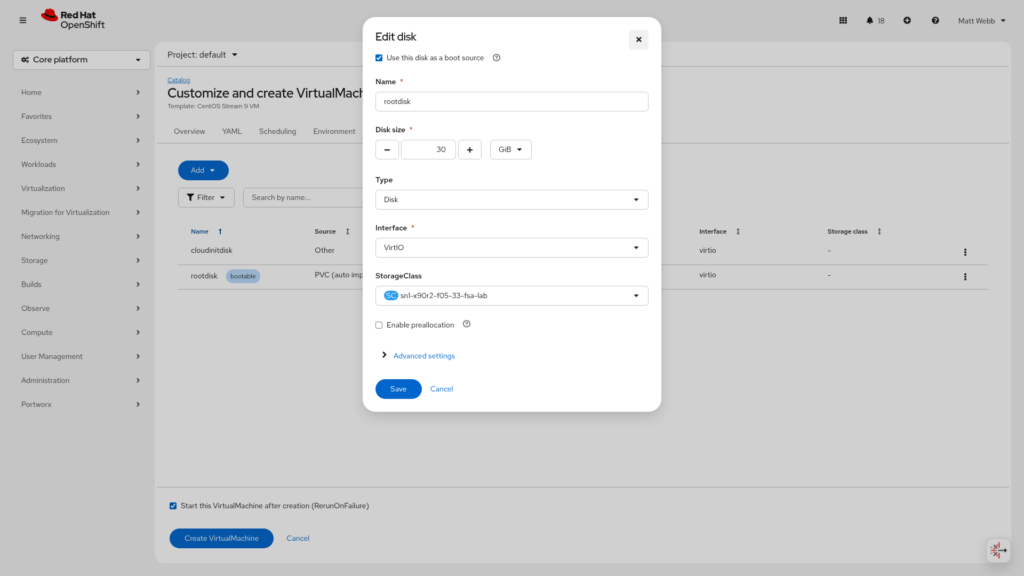
Step 7: Edit the Boot Disk
Click the three-dot menu on the root disk and select Edit. This opens the disk edit dialog.
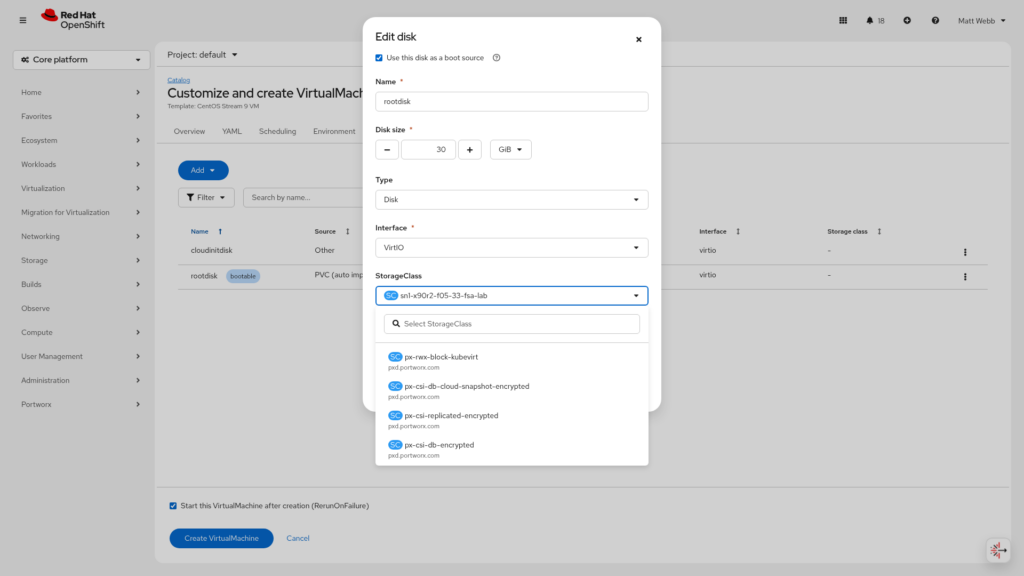
Step 8: Change the StorageClass
In the StorageClass dropdown, you’ll see all available storage classes. Select <Your-FADA-Storage-Class>
Step 9: Create and Watch It Provision
Click Create VirtualMachine. The VM will move into Provisioning state while the PVC is created on FlashArray and the OS image is copied to it. This takes a minute or two.
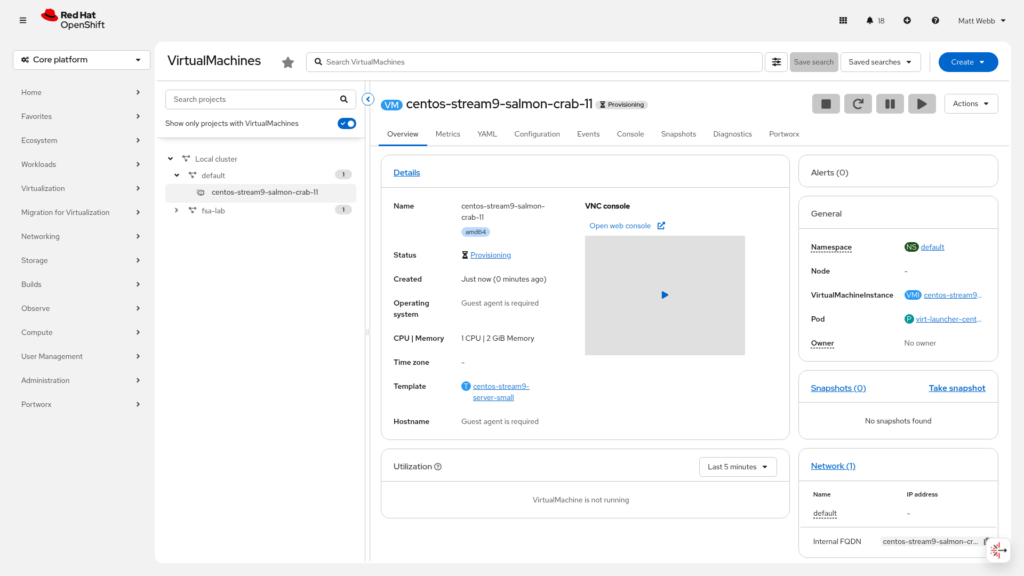
Step 10: Running!
Once provisioning is complete, the VM flips to Running.
Verify from the CLI as well:
oc get vm -n <vm-namespace>
oc get pvc -n <vm-namespace>
The PVC should be Bound and backed by a volume on your FlashArray.
Wrap-Up
That’s the full iSCSI path. from standalone VLAN subinterfaces and unique IQN creation, through MachineConfig, Portworx, and all the way to a running VM on Pure FlashArray storage.
A few things worth remembering from this guide:
- Two standalone NICs, not a bond. Portworx manages both paths via
PURE_ISCSI_ALLOWED_IFACES. Let it. - Check your IQNs before anything else. The
fix-duplicate-iqnservice handles it automatically, but knowing your template IQN upfront saves debugging time later. node.startup = manualin iscsid.conf. This is the one setting most people miss. Without it, you’ll see mysterious “session already exists” errors at boot.- Use Portworx Central to generate your StorageCluster spec. The spec builder keeps you from having to guess version strings and annotation formats.
Did you find this helpful? Reach out to me on LinkedIn if you have questions, corrections, or if something has changed since I wrote this, the virtualization landscape is moves fast!
References: